Using famewoks remotely via the ESRF JupyterHub service jupyter-slurm.esrf.fr#
It is possible to use famewoks via your ESRF account at
jupyter-slurm.esrf.fr portal.
0) Basics (only for those who are not familiar with the Jupyter ecosystem, otherwise skip this)#
Here some basics concepts about the Jupyter ecosystem. This is not an exhaustive guide, just a bird eye vue. Internet or any LLM could guide you more, if you want to go deeper in the topic.
In the following we consider using only JupyterLab, which is a web-based application that permits you running python code (and more) from your browser. You have a full development environment straight in your browser, without installing anything. We do not consider here the classic Jupyter notebook.
JupyterHub permits running multiple instances of JupyterLab for multiple users.
https://jupyter-slurm.esrf.fr is an ESRF service which starts a JupyterHub instance on the ESRF cluster via the SLURM cluster management and job scheduling system.
Once you have started your server with a JupyterLab instance, you can open a
Jupyter notebook. It is important to keep in mind that each notebooks runs with
a python kernel behind, that is, the Python environment where all libraries
and software that you need in your notebook are installed. There are some
standard Python environments installed on jupyter-slurm but they do not have
famewoks installed. For this reason, you have to install a custom python
environment first.
1) Install the famewoks Python environemnt in jupyter-slurm.esrf.fr#
The following procedure has to be performed only once:
Login into https://jupyter-slurm.esrf.fr
Go to the Advanced tab
Choose Jupyter environment: Custom with the following parameters:
Environment name:
famewoks262Path:
/data/bm16/inhouse/local/miniforge/envs/famewoks262/binClick on Add custom environment
Once this procedure is completed. You can start your server choosing the
famewoks262 environment directly from the Jupyter environment combo box in
the Simple tab. You should have a page that resembles the following one:
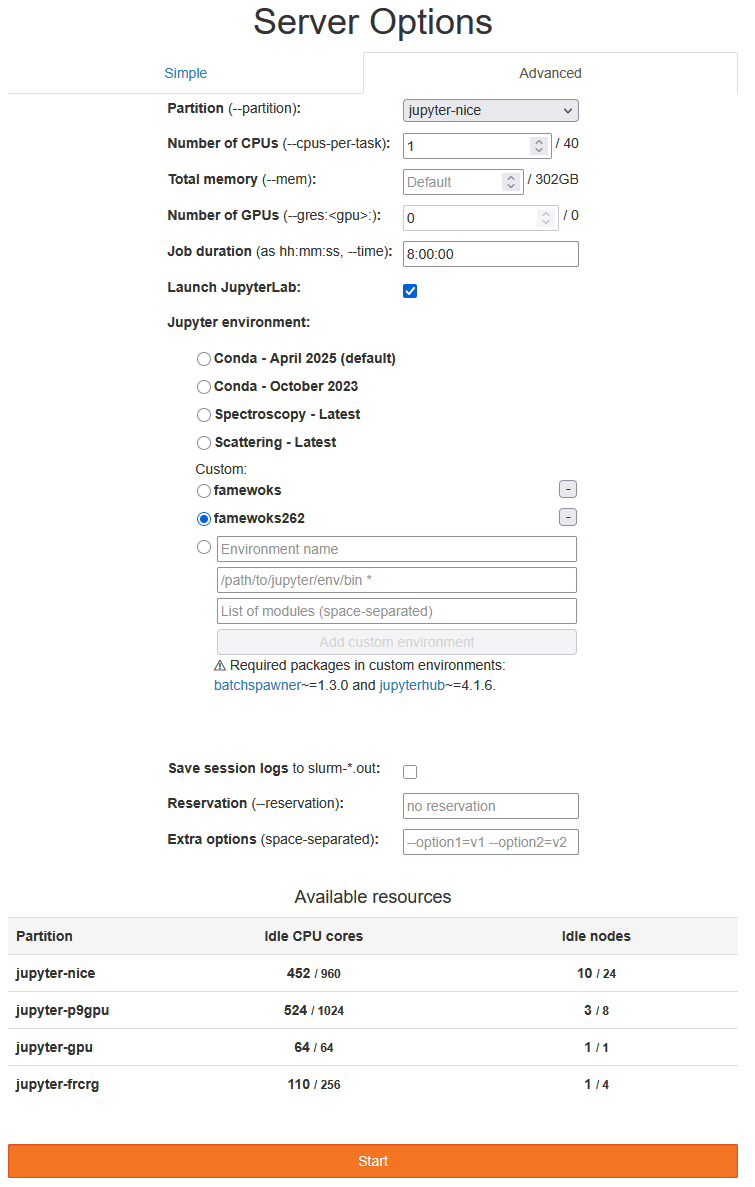
NOTES
Partition/Number of CPUs/Total memory/etc.: can be left at default values
For French CRG staff: use the
jupyter-fcrgPartitionJob duration: this is the time your server will be alive, choose it according your needs
Launch JupyterLab: make sure this is ticked
2) Access /data/visitor from JupyterLab#
When you start a JupyterLab server, it will start by default in your home
directory (/home/esrf/your_username). In the files navigation panel on the
left you will see only your home directory, not other directories mounted on
different disks. To circumvent this limitation and access to any other mount
points of the ESRF network, you have to create symbolic links to them.
The procedure is rather simple:
Open a terminal from the JupyterLab interface. Click on the “Terminal” icon, or File -> New -> Terminal.
In the terminal, create a symbolic link to your experiment data at
/data/visitor/your_proposal, called MYDATA:
$ ln -s /data/visitor/your_proposal MYDATA
You will then see MYDATA directory in the file browser panel on the left. By
clicking on it you will access your experiment’s data.
NOTES
the sampe procedure works also for accessing any other mount point available in the ESRF network (e.g.
/data/inhouseor/tmp_14_daysworkspaces).
3) Open a notebook and perform your data reduction/analysis#
From the file browser panel, go to
MYDATA/your_beamline/your_session/SCRIPTSOpen the notebook file you have started on the beamline or create your own.
Pay attention that the kernel name on the top right is
Python (famewoks)Enjoy!
NOTES
If you do not have a notebook already available in
SCRIPTS, open a terminal from the JupoyterLab interface, go to your directory and download the Data reduction notebook from https://gitlab.esrf.fr/F-CRG/fames/famewoks or any other notebook available somewhere else via a lin (e.g. a shared cloud). For example:
cd; cd MYDATA/your_beamline/your_session/SCRIPTS
wget https://gitlab.esrf.fr/F-CRG/fames/famewoks/-/raw/master/notebooks/data_reduction.ipynb
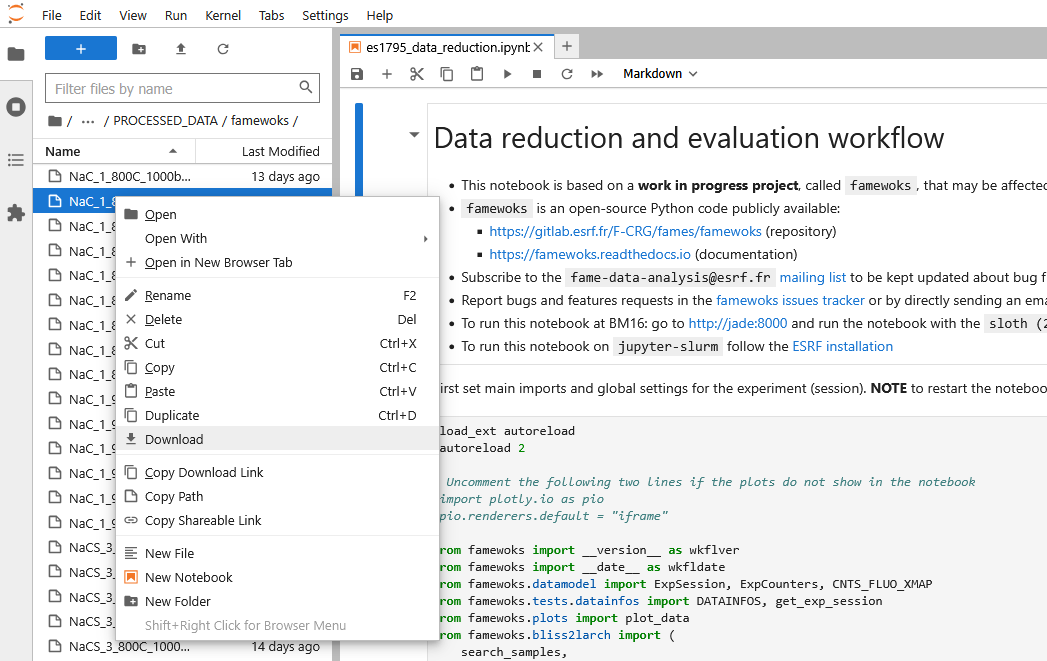
4) Download the processed data to your local computer#
famewoks saves its output data as Athena project files (.prj) that can be
easily opened in Larix, the Larch GUI to
be further processed. Those files are located, by default, in the
PROCESSED_DATA/famewoks directory. To download any file frome JupyterLab, you
can do it from the file browser panel. Right-click on the file and choose
“Download”, as shown below.
This operation is time consuming when you have many files to download. The easiest is to make an archive and download it. Here the procedure to follow:
Open a Terminal in JupyterLab
Go to the
PROCESSED_DATA/famewoksdirectoryZip the files:
zip -r myarchive.zip *.prj
Download the Zip file
Frequently asked questions (FAQ)#
What to do if I have a PermissionError?#
It may happen that you are trying to read/write data from an experiment as
unauthorized user. In this case you will have a PermissionError: [Errno 13] Permission denied: ... in the output trace. This can be solved by asking to the
main proposer of the experiment (or the local contact) to grant access to your
user account via the https://data.esrf.fr/ portal.
I do not see the figures#
If the figures do not appear, try commenting the following lines:
import plotly.io as pio
pio.renderers.default = "iframe"
Something is weird, I get strange errors#
First check that you have not done any mistake in your code
Restart the kernel process (**Kernel -> Restart Kernel)
Re-execute the notebook from the first cell